Showing posts with label How-to. Show all posts

Tuesday, May 8, 2012

Free Natural Room Freshener


Some rosemary sprigs from the yard and lemon rinds left over from the kitchen make the house smell fresh and crisp when set to simmering on the stove.


Wednesday, May 2, 2012

Easy Crochet Bangles


I'm gonna make an effort to 'make' something every day since I've noticed I feel better when I do. Call me OCD, or perhaps it's just guilt over not 'being productive'. Or maybe it's a way to trick myself into thinking I have some sort of control over my life. Not. Anyway, I bought some cheap metal bangles at the local big box store and used up some of my wool yarn. Whaddaya think?

Thursday, March 15, 2012

Upcycled Seed Starters


I've got some seeds I want to start indoors but there's no need to buy a seed starter kit from the big box store. Take a used paper egg carton, cut off the top (to be used as a 'saucer' underneath the bottom part), fill the 12 sections with dirt, plant seeds and put on a windowsill. Water daily. When the seedlings are ready to go in the ground, cut the 12 sections apart and plant the entire section.

Friday, February 24, 2012

What in Tarn-ation?


The tarn rug is coming along. I'm really liking the effect of 3 different colors held together. Of course that requires more tarn. But no worries - there are lots of cheap t-shirts at local Salvation Army...

Thursday, February 23, 2012

Fun with Tarn


I've gone a little overboard making yarn from old T-shirts (also called 'tarn')and now it's time to actually do something with it. I love using it in place of ribbon on wrapped gifts but that doesn't use much. Here's a rug I just started using three strands of tarn held together. I'll report back later on how far I actually get.

Thursday, February 9, 2012

What to do with excess novelty yarn?


I've been seeing these things around lately - strands of yarn that are knotted in a few place to make a scarf.  Having plenty of 'leftover' and novelty yarn, it seemed the perfect thing to try and perhaps get a valentine's gift for two for friends.  Not surprisingly it turns out to be a snap.  About 80-90" long seems to be the optimal length for the strands (at least for me).  That leaves plenty of room for 2-4 knots (your choice) and still have lots of free swinging fringe.  For this scarf I used 5 strands each of about 10 different yarns.   Very satisfying to make as it is quick and easy and the results can be quite flashy.  If you want one but you're not interested in making it yourself, please check my Etsy store under Shop Section 'Handmade by Me' - I have a ways to go to use up my yarn stash and these are just too much fun make to stop now.

Thursday, November 12, 2009

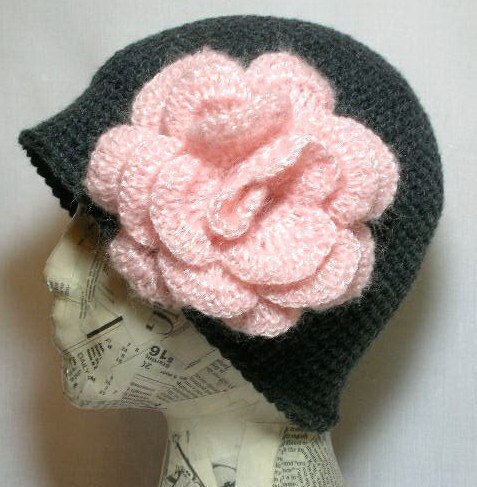
No Gauge Custom Cloche


I have been in a hat/cap/beanie making mood lately. I have no idea why since I live in Texas and it is the rare day that Texans need to keep their heads warm. But in any case, here's my 'make your own custom cloche' instructions no matter the head size or the yarn/hook combo. Works for little girls, works for big girls.

First you need to measure the circumference of the head in question. For most adults you can figure 21" if you don't want to go to the trouble of digging out the tape measure. Now we all remember that the circumference of a circle equals 2 times pi times the radius. (Where the heck is the pi symbol on this keyboard?) Moving everything around through the magic of algebra we have

diameter = circumference/3.14

The diameter is the important number here. In our example of the circumference being 21", we have a diameter of approximately 6.7". Now you crochet in the round in a continuous spiral, starting with 6 SC in the first round and increasing by 6 each time around. In other words:

ROUND 1: CH 2. SC 6 in the second chain from the hook.
ROUND 2: (2 SC in the next stitch) all the way around for a total of 12
ROUND 3: (SC 1, 2SC in the next stitch) all the way around for a total of 18
ROUND 4: (SC 2, 2SC in the next stitch) all the way around for a total of 24
ROUND 5: (SC 3, 2SC in the next stitch) all the way around for a total of 30
.... and so on....

until the diameter is close to what you calculated (6.7" in our example.) Doesn't have to be exact, just close. Now for the easy part. However many rounds you have made so far, make twice that many without increasing (one SC in each stitch from now on.) If you had 8 rounds now add an additional 16. Finish off and weave in loose ends.

In summary:
1. figure out the diameter you need (circumference of the head divided by 3.14.)
2. crochet in the round in a spiral increasing by 6 each round til you reach that diameter.
3. Now do twice as many rounds as you have already done, but only do 1 SC in each stitch.
4. Finish off and weave in loose ends.

And if you want it to be a beanie, just do fewer rounds at the end.

Thursday, October 29, 2009

The Magic (Yarn) Ball


My friend Leslie over at Wool Mountain Studio told me about 'the magic ball' the other day. How have I not heard of it before? You take your leftover yarn odds and ends and tie them end to end to make one long ball. Voila! You've found a use for all those short lengths of yarn and created a 'magic' yarn that is full of surprises. I'm crocheting this hat with a magic ball made from a big tangled glob of leftover wool needlepoint yarn. I must admit it IS fun watching the colors change as I go along. And in case you are wondering, I haven't crocheted in the loose ends on purposes. I kind of like the way it looks - it fits the whimsical nature of the Magic Ball, don't you think?

Friday, April 24, 2009

Oreo cookies that never get stale


I had some leftover black and white yarn from an amigurumi class that just finished up. Guess what I couldn't get out of my mind? For each cookie, make two black and 1 white of the following:
  • CH 2. Work 6 SC in the second CH from the hook.

  • Make 2 SC in each of the 6 stitches (12 SC total.)

  • (SC 1, make 2 SC in the next stitch) all the way around (18 SC total.)

  • (SC for 2, make 2 SC in the next stitch) all the way around (24 SC total.)

  • SL ST to the next SC and finish off. Weave in loose ends.

Use a tapestry needle and a length of the black yarn to sew together the three pieces with a running stitch. Now I'm off to the store to compare them to the real thing...

Wednesday, April 22, 2009

Recycled Windowsill Garden


Here's my entry for the Crafty by Nature Contest over at Craftstylish.com. It's easy and simple. It's not horribly impressive, but did I mention that it's easy and simple? You'll need:

* empty tin cans, rinsed out
* old wool sweater(s)
* bedding plants (or seeds) and a little soil
* a pair of scissors


Toss the sweater(s) into the washing machine using hot water and the highest agitation setting. Since they are wool they will shrink and felt up. Then toss them in the dryer or let air dry. Cut tubes from the arms the same length as the cans. Pot the plants/seeds in the cans. (And probably you should nail a hole or two on the bottom for drainage, although I didn't.) Slip the sweater tube over the can. Instant windowsill garden (or pencil holder or vase if you don't like getting your hands dirty.)

BTW, you have until midnight tonight to enter the contest - let me know if you do!

Saturday, April 4, 2009

Felt Easter Egg Tutorial


These felts eggs are easy to make and I'm pretty sure they are fun to play with.


You'll need:


  • craft felt (a 12" x 9" square will yield 6 eggs and cost about 25 cents at the local big box store)


  • polyfill for the stuffing


  • embroidery thread and an embroidery needle


  • three straight pins


  • sewing scissors


  • an egg template

For the template just trace an egg and then add 1/4" all the way around. You can also get find a free template here but you will need to reduce it to 75% the original size to get an egg that will fit in an egg case.


  • Cut out the egg shapes using the template. I fold the felt in half, pin the template to the felt and then cut two egg shapes at once. Two pieces will make one egg.


  • Whipstitch the two pieces together using the embroidery thread. I find that about a 30" length of embroidery thread is just about right length for me.


  • Leave about a 1" gap on the bottom of the egg for turning it inside out.


  • Turn the egg inside out.


  • Stick your finger in the egg and push out the seam all the way around.


  • Stuff with the polyfill nice and tight.


    Now whipstitch the bottom of the egg closed. Have fun!

Monday, March 23, 2009

Free Felted Coasters Crochet Pattern


I saw something similar to this somewhere and thought it might be fun to make up a set. The coasters and their case make an easy project for the beginning crocheter - they work up fast and make an unusual gift. You'll need:
  • about 3 oz of 100% wool medium weight yarn. (Make sure it's wool - otherwise it won't felt.) I like Lion Wool Brand and Paton's Classic Wool. If you are using 2 colors like I did, a couple oz. of each color should be enough.
  • a size F or G crochet hook
  • a 28-30 oz can of vegetables (say, a 28 oz. can of tomatoes)
  • a zippered mesh laundry bag (like the kind you wash delicates in)
  • a tennis ball or a pair of jeans
You're going to do all the crocheting in a spiral rather than end each round and start a new one. I think working in spirals is SOOO much easier, plus it's going to be felted in the end anyway so who will know?


THE COASTER (Make 4 of these):

  1. Make a circle of 6 SC. You can do this one of two ways. You can CH 2 and then make 6 SC in the second CH from the hook. Or, you can use the 'Magic Adjustable Ring.' Check the video I have for this if you don't know what I'm talking about.
  2. Make 2 SC in each SC around (12 SC total.)
  3. (SC 1, 2 SC in the next stitch) all the way around (18 SC total.)
  4. (SC 2, 2 SC in the next stitch) all the way around (24 SC total.)
  5. (SC 3, 2 SC in the next stitch) all the way around (30 SC total.)
  6. (SC 4, 2 SC in the next stitch) all the way around (36 SC total.)
  7. (SC 5, 2 SC in the next stitch) all the way around (42 SC total.)
  8. (SC 6, 2 SC in the next stitch) all the way around (48 SC total.)
  9. SL ST to next stitch and finish off.

THE CASE:

  1. Repeat steps 1-8 of the coasters.
  2. (SC 7, 2 SC in the next stitch) all the way around (54 SC total.) If you want a two-toned holder, here is a good place to switch to your second color.
  3. SC in each stitch all the way around (54 SC total.)
  4. Repeat step 3 for 9 more times.
  5. SL ST to the next stitch and finish off.

FELTING:

Now you are ready to felt this stuff. Put everything in that mesh laundry bag and put it in your washing machine with that tennis ball or pair of jeans. The tennis ball (or jeans) will help agitate the wool and get it to felt up. Set the wash on the lowest water setting, the highest agitation setting and use hot water. Run it through a wash and rinse cycle. If the pieces aren't felted enough to your liking, you can wash 'em again. Trim any loose ends. Now to shape everything. It should be pretty easy to get the coasters flattened out - just stretch with your hands, if needed . As for the case, put it over the end of the vegetable can and tug it into shape. You make have to pull a bit on this one. It should look something like this (can you tell I live in Texas?):


Once you get it evened out, let everything just sit until it's dry. This could take up to 24 hours but overnight usually does it for me. That's it! Here's my set going for a test drive.

Let me know how yours turn out!

Wednesday, March 18, 2009

How to Make T-shirt Yarn


I looked at a lot of instructions and videos on the net and here is my take on how to make yarn from old t-shirts:

  1. The t-shirt must have no side seams, otherwise it's not going to work.
  2. Wash the t-shirt in hot water and dry on high to make sure it's shrunk as much as it is going to.
  3. Get out your ironing board. (no, not to iron the t-shirt.)
  4. Slide the t-shirt on the ironing board. This will make subsequent cutting much easier. (BTW, set up the ironing board opposite how you usually do it. If you are right-handed, point your ironing board to the right. If you are left-handed, point it to the left.)
  5. Cut off the bottom hem of the t-shirt.
  6. Cut along the bottom edge at an angle until you have about 1" in width. Then keep cutting in a spiral round and round, keeping the strip approximately 1" wide. This is where the ironing board makes it easier - just rotate the shirt around as you cut. And don't be OCD about getting it exactly 1" or exactly straight - just guesstimate. Or make it wider than 1" if you what. Your call.
You will eventually hit an obstacle - either the armpits or a print on the t-shirt. This is the end of your yarn-making adventure (at least with this t-shirt.) Let go. Cut it loose. Now, hold about a foot between your two hands and pull apart. The strip will naturally curl on the purl (or is it knit?) side. Whatever. It will curl on it's own if you pull it hard enough. Work your way down the strip pulling for the entire length.

Voila! You have t-shirt yarn! This bright green t-shirt was a size XL and I got about 32 yards from it. Now I just have to figure out what to do with it.

Thursday, March 5, 2009

The Slip Stitch

The slip stitch (abbreviated 'SL ST') is very easy. You will see it in lots of patterns, especially when you have to connect pieces or move along the edge without adding any height. Just slide the yarn under the next stitch, YO (yarn over) and then pull through the stitch and through the loop on the hook.

Thursday, February 5, 2009

The Single Crochet Stitch

The Slip Loop and The Chain Stitch

How to start your crochet project with a Slip Loop - and how to make the foundation row with the Chain Stitch.

Wednesday, February 4, 2009

How to hold the yarn and the hook

Sorry about the grainy image - I used an old digital camera and it was also an overcast day. But hopefully this will help you get the idea. Bottom line: left hand holds the yarn and doles it out, right hand wields the hook.

For someone who has never attempted crochet, I suggest starting with a size F or G hook and a plain medium weight yarn (the yarn label will say either 'medium' or 'size 4'.)

Thursday, August 14, 2008

Tie-dye Yarn?


If you are feeling adventurous, you can use the technique I described in my previous post to 'tie-dye' your yarn. The only difference is the order you put stuff in the crockpot. After the yarn has soaked in the bowl for an hour, add it to the crockpot (which is already filled with water and 1/2 cup vinegar). Now you get to mix up your colors. Mix up each kool-aid color in it's own little bowl with a small amount of water. Be sure you don't choose colors opposite each other on the color wheel - like red and green - or you will get brown. I'm guessing it's safest to select colors that are next to each other, but then I am no color theorist. Anyway, pour each color into the crockpot in its own spot, being careful not to mix the water. The colors will spread a little and mix but pretty much stay in place. Cover your crockpot and turn it on!

Tuesday, August 12, 2008

The Easy Way to Dye Wool Yarn


It is surprisingly easy to dye wool yarn using only vinegar and kool-aid. The photo above is my 'before' picture of Lion Brand 100% wool yarn that I bought at the local Hobby Lobby. Here is what you need: a crockpot, a bowl, a salad spinner (not absolutely necessary, but comes in handy), white vinegar, and several packets of kool-aid in the color you want to use. And the process is:


  1. Fill your bowl with enough water to cover your loosely wound skein of yarn.

  2. Add 3/4 cup vinegar to the water, then add the yarn.

  3. Let sit for 1 hour.

  4. Fill your crockpot with enough water to cover your yarn.

  5. Add 1/2 cup vinegar to the crockpot.

  6. Add the kool-aid packets to the crockpot (the more packets the darker the color) and stir well.

  7. Move the yarn from the bowl into the crockpot.

  8. Turn the crockpot on high, cover and wait until the crockpot water runs clear. (The yarn will eventually soak up all the dye from the kool-aid.) This may take a few hours.

  9. Turn off the crockpot, uncover and let the water come to room temperature.

  10. Rinse the yarn a few times with water.

  11. If you have a salad spinner, spin the yarn a few times to get out excess water. Otherwise gently wring out the water and then wrap tightly in a bath towel to help dry it out.

  12. Drap the yarn on a clothes hanger and hang it somewhere to air dry.

Voila! The picture below shows how some of the colors turned out. The kool-aid flavors used were lemonade, orange, grape, pink lemonade, lime, and berry blue.


Saturday, August 9, 2008

Recycled wool - part 3

Ok. ok. I know I haven't posted in awhile (has it really already been a month?) but things have been very busy at home. Plumbing problems in the middle of getting ready to have the extended family in town for a 'family vacation', 100+ degree heat that makes me want to do nothing except hibernate until October, and a few other less urgent problems. That is the reason I haven't posted lately. That and the fact that the wrist warmers didn't turn out so well. In fact, I threw them away before I weakened and took a picture to show you how truly awful they looked after dyeing them orange. So just take my word for it. But, there is a silver lining. I am getting great colors dyeing new cream colored wool yarn with kool-aid. More on that once I get a few pics to show you....