Showing posts with label crochet. Show all posts

Wednesday, May 2, 2012

Easy Crochet Bangles


I'm gonna make an effort to 'make' something every day since I've noticed I feel better when I do. Call me OCD, or perhaps it's just guilt over not 'being productive'. Or maybe it's a way to trick myself into thinking I have some sort of control over my life. Not. Anyway, I bought some cheap metal bangles at the local big box store and used up some of my wool yarn. Whaddaya think?

Friday, February 24, 2012

What in Tarn-ation?


The tarn rug is coming along. I'm really liking the effect of 3 different colors held together. Of course that requires more tarn. But no worries - there are lots of cheap t-shirts at local Salvation Army...

Thursday, February 23, 2012

Fun with Tarn


I've gone a little overboard making yarn from old T-shirts (also called 'tarn')and now it's time to actually do something with it. I love using it in place of ribbon on wrapped gifts but that doesn't use much. Here's a rug I just started using three strands of tarn held together. I'll report back later on how far I actually get.

Sunday, February 19, 2012

Yet another Lacy Scarf


I just added another 'lacy scarf' pattern to my Etsy shop.  This one is fun to make because it is easy and it makes up fast.  Perhaps a little old-ladyish?  I can't really tell, but hopefully my teenage niece as well as my mom will like it.

Monday, August 22, 2011

Snow in Texas in August...


I must be unconsciously dreaming of cold weather since the heat this summer in Texas has been beyond oppressive. How else to explain my current obsession with making hats? This one is made with bits and pieces of novelty yarns left over from a recent reorganization of my vast and mysterious yarn stash.

Sunday, August 14, 2011

When Aliens Attack


My mom is big into conspiracy theories, including alien abductions and the like. A old skein of neon green yarn and a lazy afternoon produced something she can wear to her MUFON meetings...

Friday, May 28, 2010

Magic Ball Scarf

I'm currently working on a light summer scarf made from a 'magic ball' - a ball of yarn composed of lengths of many different yarns. For a control freak like me it's a little unsettling not knowing what yarn will turn up next. But lots of fun as it turns out.


- Posted using BlogPress from my iPhone

Friday, May 7, 2010

Let's Get ready to Scrumble!

One of the things on my crochet to-do list is to learn how to scrumble. Scrumbling is free-form crochet, i.e., making it up as you go along. I found a great set of tutorials to download here. Anyone else going to try it?

Thursday, February 18, 2010

Hooded Scarf, or Scood to you.


With blizzards seemingly everywhere this winter this simple head wrap seems like a good idea. It's called a 'scood' - short for 'hooded scarf.' Or should that be 'scarf with a hood'? In any case, it will keep both head and neck warm.

Pattern available in my etsy shop or on Ravelry.

Sunday, January 24, 2010

Make a Rose Scarflette for Valentine's Day


A customer asked for this design not long ago, and I had a lot of fun trying to figure out the easiest way to construct it. After a few false starts, I finally came up with something I'm happy with. It can be made with a tie (shown) or a button closure.

Pattern available in my etsy shop or on Ravelry.

Saturday, January 2, 2010

The Biggie Circle Scarf


I have been admiring the circle scarfs that seem to be so popular, especially the moebius strip type that, technically speaking, have only one side. Alas, my version has two sides but it is very easy to make and works up fast (would you believe less than an hour?) when you use a giant hook (size Q) and 5-6 strands of yarns at a time.

Pattern available in my etsy shop.

Friday, November 27, 2009

Speaking of crocheted hats...


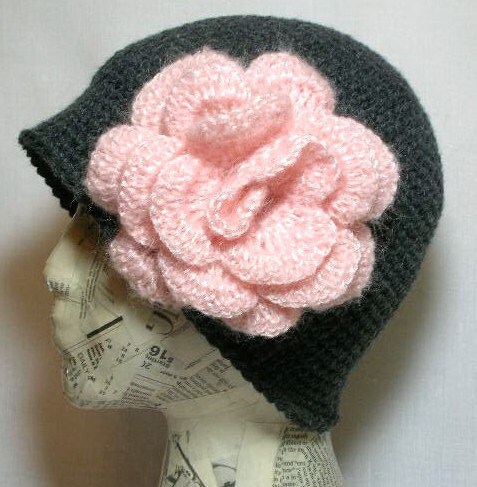
I made this hat using the instructions in my previous post for a friend who saw a similar knitted one she liked. I used two strands of yarn crocheted together - a bulky weight pink yarn and a white eyelash yarn. A second friend saw the hat when my husband passed it off to the first friend and asked for one in red for her mom. Since I was on a roll (and have quite the eyelash yarn stash), I worked on a white on white one during the long Thanksgiving drive to Dallas which promptly ended up on the head of my teenaged niece. Several other family members noticed it during the holiday feast and requested hats in various colors. I am quite surprised - but pleased! - at its reception. What with two strands of yarn and a large (size K or more) hook, this thing works up surprisingly fast - 3 hours max. So if you need to make a last minute Christmas gift, may I suggest....

Thursday, November 12, 2009

No Gauge Custom Cloche


I have been in a hat/cap/beanie making mood lately. I have no idea why since I live in Texas and it is the rare day that Texans need to keep their heads warm. But in any case, here's my 'make your own custom cloche' instructions no matter the head size or the yarn/hook combo. Works for little girls, works for big girls.

First you need to measure the circumference of the head in question. For most adults you can figure 21" if you don't want to go to the trouble of digging out the tape measure. Now we all remember that the circumference of a circle equals 2 times pi times the radius. (Where the heck is the pi symbol on this keyboard?) Moving everything around through the magic of algebra we have

diameter = circumference/3.14

The diameter is the important number here. In our example of the circumference being 21", we have a diameter of approximately 6.7". Now you crochet in the round in a continuous spiral, starting with 6 SC in the first round and increasing by 6 each time around. In other words:

ROUND 1: CH 2. SC 6 in the second chain from the hook.
ROUND 2: (2 SC in the next stitch) all the way around for a total of 12
ROUND 3: (SC 1, 2SC in the next stitch) all the way around for a total of 18
ROUND 4: (SC 2, 2SC in the next stitch) all the way around for a total of 24
ROUND 5: (SC 3, 2SC in the next stitch) all the way around for a total of 30
.... and so on....

until the diameter is close to what you calculated (6.7" in our example.) Doesn't have to be exact, just close. Now for the easy part. However many rounds you have made so far, make twice that many without increasing (one SC in each stitch from now on.) If you had 8 rounds now add an additional 16. Finish off and weave in loose ends.

In summary:
1. figure out the diameter you need (circumference of the head divided by 3.14.)
2. crochet in the round in a spiral increasing by 6 each round til you reach that diameter.
3. Now do twice as many rounds as you have already done, but only do 1 SC in each stitch.
4. Finish off and weave in loose ends.

And if you want it to be a beanie, just do fewer rounds at the end.

Thursday, October 29, 2009

The Magic (Yarn) Ball


My friend Leslie over at Wool Mountain Studio told me about 'the magic ball' the other day. How have I not heard of it before? You take your leftover yarn odds and ends and tie them end to end to make one long ball. Voila! You've found a use for all those short lengths of yarn and created a 'magic' yarn that is full of surprises. I'm crocheting this hat with a magic ball made from a big tangled glob of leftover wool needlepoint yarn. I must admit it IS fun watching the colors change as I go along. And in case you are wondering, I haven't crocheted in the loose ends on purposes. I kind of like the way it looks - it fits the whimsical nature of the Magic Ball, don't you think?

Saturday, October 24, 2009

Easy Crocheted Hooded Cowl


Our first cold snap put me in the mood to create something warm. This cowl will keep your neck warm. Or pull it up over your head like a hood to keep your head and ears warm. Or pull it down over your shoulders to keep them warm. Or do all three.

Pattern available in my etsy shop.

Monday, October 5, 2009

Ready for the Renaissance Faire


This Juliet cap was specially requested by a friend. It takes less that 100 yards of yarn, can be easily finished up in a hour or two, and it's absolutely perfect for the Texas Renaissance Festival! If you've never been, I strongly encourage you to go - and wear your walking shoes.

Pattern available in my etsy shop.

Tuesday, April 28, 2009

How to Make your Swiffer Green


I have a Swiffer and I like it. But I keep forgetting to buy those sheets for them. And since I am a bit of a tightwad, I resent having to buy them in the first place. They seem expensive, don't you think? Anyway, a crocheted swiffer sock pattern over at Craftstylish looked like a cheap (and green) solution - a reuseable cover that can go in the washing machine. The next thing that popped into my head was those 50's crocheted dusting mitts with the loops. I'm a sucker for everything mid-century modern so I had to have one with loops. Add research on the loop stitch and ugly old acrylic yarn and I've got my loopy duster. And I bet synthetic yarn is better at creating static electricity than the fancy stuff anyway.

Friday, April 24, 2009

Oreo cookies that never get stale


I had some leftover black and white yarn from an amigurumi class that just finished up. Guess what I couldn't get out of my mind? For each cookie, make two black and 1 white of the following:
  • CH 2. Work 6 SC in the second CH from the hook.

  • Make 2 SC in each of the 6 stitches (12 SC total.)

  • (SC 1, make 2 SC in the next stitch) all the way around (18 SC total.)

  • (SC for 2, make 2 SC in the next stitch) all the way around (24 SC total.)

  • SL ST to the next SC and finish off. Weave in loose ends.

Use a tapestry needle and a length of the black yarn to sew together the three pieces with a running stitch. Now I'm off to the store to compare them to the real thing...

Thursday, April 2, 2009

Sugar Free Peeps for Easter

[chiwaluv's Etsy Shop]

I found a crochet pattern for these adorable amigurumi peeps at
Chiwaluv Amigurumi Critters - perfect for Easter. Only 4 bucks for the pattern - about what you'd pay for real peeps plus your kids won't get cavities.

Saturday, March 28, 2009

Non-Euclidean Geometry meets Crochet


Ever heard of Hyperbolic Geometry? Apparently it is the geometric opposite of the sphere. On a sphere, the surface curves in on itself and is closed. On a hyperbolic plane the surface curves away from itself at every point. In other words....
In Euclidean geometry, as a circle gets larger, the length of the circumference increases linearly. But with a hyperbolic plane, we're talking EXPONENTIAL increases. Got that?
Oddly enough, the concept of a hyperbolic plane can be physically modeled using crochet.

Yes, you can impress your family and friends by making your own hyperbolic surface! All you do is increase the number of stitches in each successive row or round of a crochet project. That's it. Here's how to make a 'pseudosphere' (like the one I made pictured above):

1. CH 2. SC 6 in the second chain from the hook (6 SC total).
2. SC 2 in each stitch all the way around (12 SC total).
*BTW, I like to crochet in a spiral and not worry about ending rounds and starting another. So just keep going with step 3 - don't worry about making a SL ST to the last stitch in the round and all that stuff.
3. SC 2 in each stitch all the way around (24 SC total).
4. SC 2 in each stitch all the way around (48 SC total).
5. SC 2 in each stitch all the way around (96 SC total).
I think I stopped after step 5 but feel free to keep going!

You'll get a kinesthetic feel for what 'expanding exponentially' REALLY means. Early rounds go quickly, but each successive round takes longer and longer (and also eats up exponentially increasing amounts of yarn.)

If you want to learn a little more about the mathematics involved, check out this article or just google 'hyperbolic crochet.'